
Part of our series "What to Expect Before, During, and After Your Clean Energy Upgrade"
See additional "What to Expect…" articles here
Going solar is one of the most rewarding upgrades you can make. Pair it with a battery, electric appliances, and an EV, and you’re literally riding on sunshine, untethered from volatile gas prices and oil wars.
The process takes patience. Solar and batteries require coordination with your city and your utility, so while installation takes just a few days, the full journey typically runs three to five months. We’ve walked hundreds of homeowners through it.
Before you begin any clean energy upgrade, be sure to reach out to us for our no-cost, expert guidance hello@quitcarbon.com.
Here’s what to expect:
📝 BEFORE: Planning and choosing your system
(2–6 weeks)
1. Share your energy data (10 minutes). Your contractor will ask for 12 months of electricity usage, downloaded as a .csv file with interval data from your utility account, plus a recent bill. Here's a helpful article detailing how to retrieve your utility data. This is how they size your system. Contractors typically size systems with about 30% headroom over your current usage. This is the best time to tell them if you're planning a heat pump, heat pump water heater, induction stove, or EV, so the system is sized for your future home, not your current one.
 2. Meet your contractor (within 1–2 weeks of your referral). Most contractors reach out within a day or two to schedule a consultation, either virtual or at your home. Expect questions about your roof, electrical panel, shading, and goals like backup power for outages, energy independence, environmental aspirations, or lower bills.
3. Review your proposal (a few days to a few weeks). Proposals typically arrive within a week of the consultation. Send yours to Hello@QuitCarbon.com, and we'll review it with you: sizing, pricing, equipment, warranties, and available incentives. Take your time here, and ask every question you have. Our clients' best projects came from people who asked a lot of them.
4. Sign and pay your deposit. Many installers start with a modest deposit, often $500–$1,000 or sometimes 10% of the project. The rest is typically paid in stages, such as half at installation and half after final inspection. Confirm the schedule in writing. If you're financing, ask your contractor when the loan approval needs to be in place. Some prefer you start with a cash contract and convert it once your loan is approved.
5. HOA approval. Some HOAs require approval before any work begins. Talk to your HOA board as early as possible. (Some states still allow HOAs to deny solar on front-facing roofs.)
🔩 DURING: Design, permits, equipment, and installation (8–16+ weeks)
This is the stretch where it can feel like nothing is happening. But a lot is going on behind the scenes.
6. Site survey (1–3 weeks after signing). A technician visits to measure your roof, inspect your electrical panel, and photograph everything the engineers need. Survey calendars fill up in summer, the peak solar season, and during the year-end tax credit rush, but a two-week wait is normal.
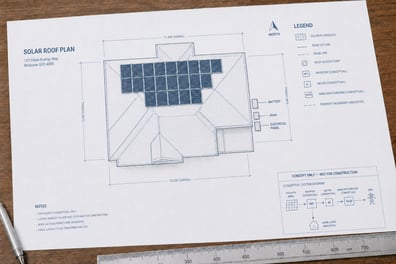 7. Design and plan approval (2–4 weeks). Engineers turn the survey into a formal plan set. You'll usually be asked to sign off on the final layout. Before you sign off, check:
- Are the panels on your sunniest roof areas and clear of vents and chimneys?
- Where will the inverter and battery go? Will they block anything, sit near a bedroom, or lack required clearance (36 inches from a doorway exit in some jurisdictions)?
It's much easier to move a battery on paper than after it's bolted to your wall.
8. Permits and utility application (1–6 weeks). Your contractor applies for a building permit through your local Authority Having Jurisdiction (AHJ). They also submit an interconnection application to your utility, such as PG&E, SCE, or SDG&E. You may get a DocuSign from the AHJ and utility to confirm. Permitting timelines vary widely by jurisdiction, and utility reviews can also run long. Either one can extend your overall timeline.
9. Equipment sourcing (often alongside permitting). Your contractor orders the panels, inverter, and battery specified in your design. Occasionally, supply constraints require a minor equipment substitution. If that happens, you'll be notified before any change is made, and it's worth forwarding the details to us so we can confirm it's comparable.
10. Scheduling your installation date (1 week to 2+ months). Once permits and equipment are in hand, you join the installer's schedule, usually in the order contracts were signed. In normal times that means one to two weeks. During busy seasons, especially at year-end or before an incentive deadline, it can mean two months or more.
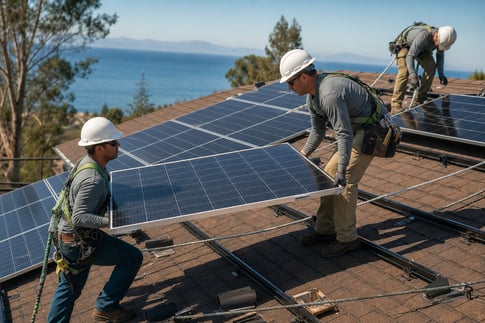 11. Installation (1–2 days for solar only, 3–5 days for solar & battery). Clear the area near your electrical panel and anywhere equipment will go, and make sure the crew has parking. A typical installation happens in two phases:
- Roof work (1–2 days). The crew mounts the racking and panels. Rain pauses this phase, since a wet roof isn't safe to walk on and nobody wants a leak.
- Electrical work (1–3 days). The crew installs the inverter, battery, monitoring hub(s), and any electrical panel upgrades, then connects everything. Expect a brief power shutoff, typically 2–4 hours.
🏡 AFTER: Inspection, Permission to Operate, and enjoying your system (2–6 weeks) ☀️
12. Final inspection (1–6 weeks after install).Your city or county inspector must sign off on the work before your system can be turned on. Sometimes the inspector asks for a correction, like moving equipment to meet clearance rules, which adds a return visit. This is uncommon but not unheard of, and your contractor handles it.
 13. Permission to Operate (a few days to several weeks). After inspection passes, your contractor submits final paperwork to your utility requesting official authorization to turn on your system, called Permission to Operate (PTO). Do not turn your system on until you have PTO. Your contractor will tell you when you can activate it.
14. Your closing packet and monitoring app. Expect a final packet with your plans, approved permit, and PTO letter. Keep it forever; you'll need it for incentives, warranty claims, and selling your home someday. You can upload it to your QuitCarbon Home Profile under Files & Photos for easy access. Your contractor will also help you set up your inverter and battery monitoring app, so you can watch your solar production, home consumption, and battery levels in real time.
15. Rebates and follow-up. Contractor-filed incentives like SGIP battery rebates pay out on their own timelines. Don't forget to claim your QuitCarbon rebate! Congratulations: your home now runs on abundant, clean, resilient energy, and you're saving money while you do it.
💡 Tips from homeowners who've been there
- Send your usage data and utility bill right away.
- Keep QuitCarbon CC'd on every email with your contractor.
- Save every document in your QuitCarbon Home Profile, including your contract, plan set, permit, and PTO letter.
- If a few weeks pass without news, a friendly check-in is perfectly fine.
- Plan buffer time if you have a hard deadline, and expect summer and year-end to run slower.
- Take photos of any gas equipment before it's removed, since some rebates require them.
Going solar takes patience, but our clients consistently tell us it's worth it. The day your panels start producing clean energy from your own roof is a great feeling, and we'll be there with you every step of the way.
Contact us with any questions.